 Today’s session of our Free Online In-depth wood carving Winter 2014 Seminar, taught by Lora Irish, wood carving and pyrography book author and line art pattern maker, will focus on the hand positions and knife cutting positions for chip carving.
 Chip Carving Seminar
Chip Carving Supplies
Chip Carving Graphed Patterns
Chip Carving Hand Positions and Grips
Chip Carving – Triangles and Square Chips
Chip Carving – Straight-Wall Chips
Chip Caved Game and Chess Board
Chip Carving Sampler Pattern Layout
Chip Carving Common Mistakes
Chip Carved Shortbread Cookies
As a small treat I have posted my favorite shortbread cookie recipe that I use with my handmade chip carved cookie presses. Hope you enjoy them as much as my family does.
Basic Hand Positions for Chip Carving
How you hold your knife and how you rest your hand against your chip carving wood project determines the angle of the chip walls. Let’s look at the basic positions used to create the angle and depth of your cuts.
Lay your chip knife into the palm of your hand, with the top edge of the wood handle in the bend of your index finger. The handle crosses the palm along the natural fold of the palm. Keep a light, loose grip. Too much tension on the knife can make large cuts difficult to execute and will cause your hand to tire quickly.

 Three and Four Sided Chips

The three-sided triangle chip is the most common cut chip in this wood carving style. The knife is held at 45 degrees to the wood as it is pushed into one leg of the triangle. The point of the blade cuts to the center point of the well inside the chip. In the photo, the black dot in the center of the triangle pattern is the point of the chip well.

 Straight-wall Chips

Straight-wall chips have two sides of the chip cut with the knife between 85 to 90 degrees of the wood. The intersection point of these two sides creates the deepest corner of the chip. The knife is places with the point of the blade at the corner point of the two straight sides, then pushed into the wood.
 Sloped Floor to Straight-wall Chips

To create the sloped floor of the straight-wall chip the knife is dropped low to the wood. Slide the blade point into the straight-wall corner, thinly slicing the third side of this chip. For large straight-wall chips I use a detail wood carving bench knife, instead of my large chip knife. The added length of the bench knife blade allows me to drop the cut dramatically.

 Curved-edge Chips

Many designs have curved-edges to some of the chips. Curves are cut by changing the angle of the knife from the wood as you move the blade through the curved line. Begin with your knife held at a 45 degree angle to the wood. As you pull the knife towards the center point of the pattern line, gradually drop the angle of the blade to the wood – close to a 30 degree angle. To work the second half of the pattern line, gradually raise the blade back to the 45 degree position.
Changing the angle as you pull through the stroke enables to blade point to reach the center point in the chip well.
Free Form Lines
Free form lines are made using two side cuts instead of the traditional three or four-sided chips. This creates a v-trough line that begins at a fine point, widens at the center point of the line, then narrows back to a point. Use the same knife angles as you would for a curved-edge chip.

 Sample Chip Carving

The chip carving sample, shown right, uses all of the basic chip styles – triangle, square, straight-wall, curved-edge, and free form. You can see how the angle of the blade to the wood determines the slope of the chip walls.
As a fun note, the bottom three large leaf-shaped cuts are cut as a curved-edge or free form chip. This type of chip was very common during the early 1900’s and often called Spoon Carving.

 Positive and Negative Space
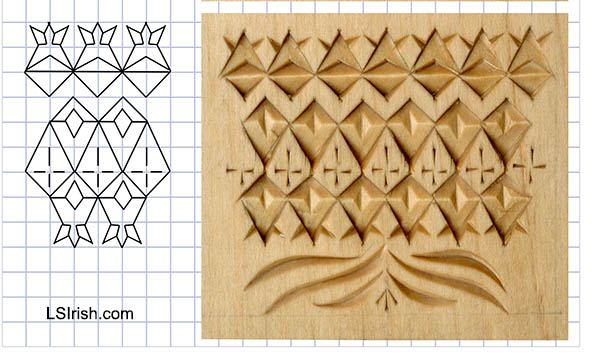
The areas that you cut in a chip carving are called positive space – these areas have actually been worked. Those areas that you do not cut and that are left at the original level of the wood are called negative space – space you have not cut.
You can dramatically change the look of any chip carving pattern by controlling the positive and negative space in the design. In the photo sample you can clearly see a zig-zag pattern beneath the top border chip carved pattern. The dramatic shadows inside of the straight-wall chips in the rows above and below this un-carved line makes that zig-zag prominent. In the large border pattern, below the zig-zag, an inverted diamond has been left un-carved. Again, the shadows of the straight-wall chips that surround this area brings that diamond visually forward. The small cross pattern inside the un-carved diamond was made using a push stroke with the stab knife.

 Today’s Free Chip Carving Patterns by Lora Irish from LSIrish.com.

Click on the image, right, for a full-sized printable pattern.
Here’s your treat for today! Over the weekend please gather your supplies – basswood practice boards, chip carving knives, removable spray adhesive, 320-grit sandpaper. On Monday, January 20th we will begin cutting the sample patterns using the six types of chip carving cuts – triangle, square and rectangle, straight-wall, curved-edge, free form, and accent chips.
Thanks for reading!