
 In Pyrography Feather Border 1 we worked the steps for preparing your wood board, tracing the pattern, shaping the feathers, and adding drop shadows to this free, online wood burning project with a free pattern. Today we will go through the steps for detailing the feathers, adding a drop shadow to the fur clusters, using painter’s tape as a masking agent, and working the geometric border using a dot-fill pattern.
This is a long posting, but I wanted to share this project over just two days. Please, bookmark our blog so that you can return at any time to work through and complete this free pyrography project.
Wood Burning Step 5 – Detailing the feather
Click on any image in this posting for a large image that you can save to your computer.
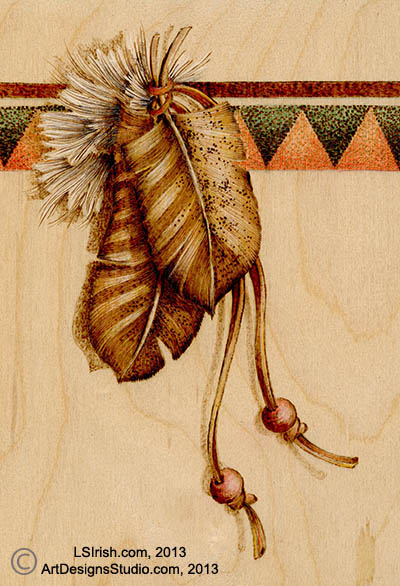
The curved shader has a slightly rounded edge along its thin metal tip. This edge cuts a very fine line into your wood. On low temperature settings, that line may have a very pale tonal value but you will be able to see the shadow along the cut edge of the stroke. On higher settings the curved shader will burn slightly wider, darker lines.
Feathers are made up of many long, thin sections – mini-feather lines. To create those lines set your temperature setting to a mid-medium tonal value and using the belly edge of the curved shader pull long detailing lines from the center shaft towards the outer edge of each feather. As you pull these lines the starting point of the line will naturally burn darker and gradually pale in tonal value as you move through the stroke.
Work a second layer of curved shader lines in the feathers, starting from the outer edge and pulling towards the center. Match the curve shape of these two layers of lines.
Wood Burning Step 6 – Adding a drop shadow to the fur
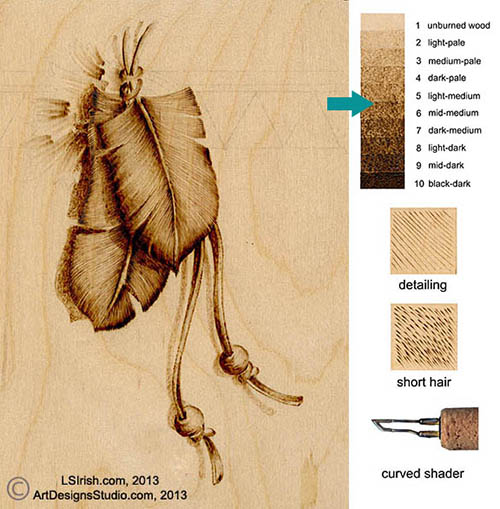
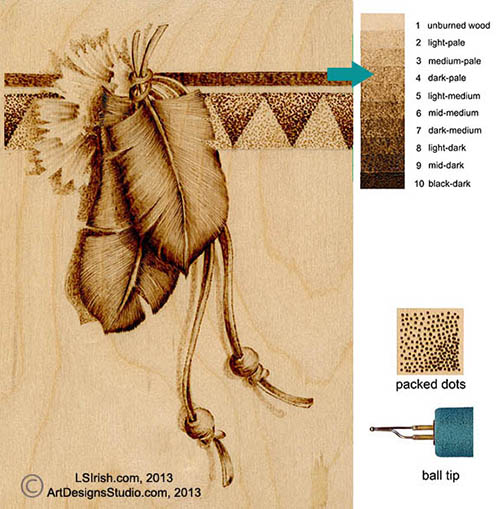
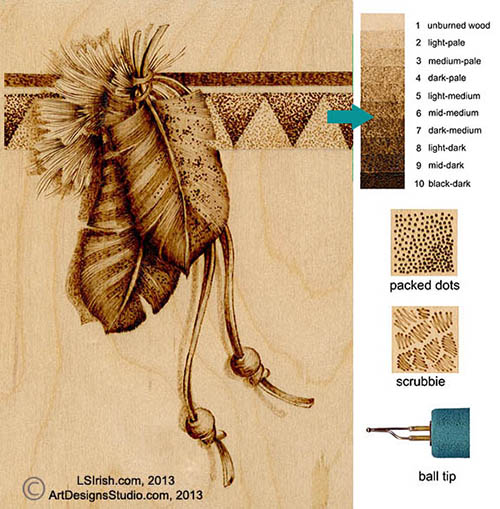
With the basic shape, shading, and detailing done in the feathers it is time to move into the fur clusters. Using the ball tip or looped tip pen, a heat setting of dark-pale tonal value, and the dark-fill or scrubbie stroke, create a drop shadow in the left background for the fur clusters. Since fur is made of many fine hair lines this shadow is not as dark as the more solid feather element.
Wood Burning Step 7 – Painter’s tape masking agent
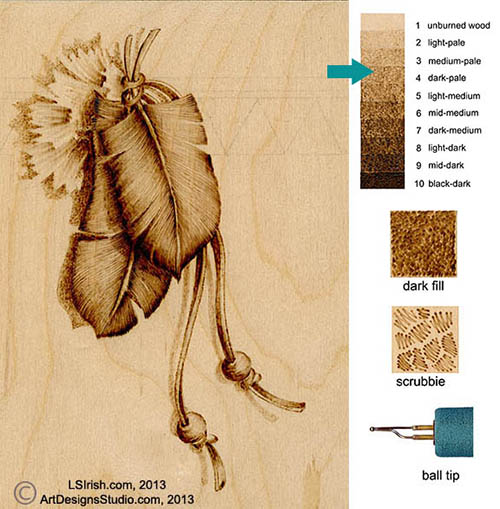
Painter’s tape, a thick version of masking tape, can be used as a masking agent to block or protect your wood when you are working at temperature below the very dark tonal value heat settings. This project has a straight line border which is perfect for painter’s tape masking.
With scissor cut small pointed triangles from your strip of painter’s tape. Place the point in the point of the area you want to protect, laying the long, straight side of the tape along the pattern line. Press into position. Fill all of the areas that you want to protect for this burning step with tape. Use long, straight pieces of tape to protect the unburned border line above the geometric triangle line. Please follow the image above for placement.
On a dark-pale to mid-medium tonal value setting, the ball tip or looped tip pen, burn tightly packed dots into the exposed triangles in the border. More dots are added at the point of the triangle to give a solid fill effect. As you work up towards the top of the triangle allow more open space between the dots.
Wood Burning Step 8 – Removing the painter’s tape mask

Because the painter’s tape protects any wood on which it lies you can bring your burning tip up to and even over the tape as you work your stroke patterns. When you carefully lift the tape any burning strokes that passed over the tape are also removed, leaving a clean, unburned area. You can see in the photo that the triangles between those that we just burned have very straight edges from the tape.
Transparent tape is not recommended as a masking agent. This type of tape tends to be too thin to withstand the burned strokes. It also can have too much adhesive grab, causing some of the wood fibers to pull off the board when you remove the tape. Masking tape can be used as a masking agent for mid-range temperature setting.
Wood burning Step 9 – Working the second set of border triangles.
Repeat Step 7 – 9 for the remaining triangles in your border. Use painter’s tape to mask off the pattern so that only the remaining triangles are exposed. Use a dark-pale tonal value temperature setting, the ball tip or looped tip pen, and the packed dot fill stroke to burn these areas. The heaviest dot fill is at the bottom edge of these triangles, with a less dense fill at the point. Painter’s tape can easily be used over areas that have already been burned to protect that area from the work that you are about to do. In this feather border the dark triangles are masked so that the pale triangles can be filled.
Wood Burning Step 10 – Adding the final detailing
The final step to this wood burned feather and geometric line border is to add the feather decoration pattern, to accent line the leather strings, and to add fine hair lines into the hair clusters.
Using the ball tip or looped tip pen, a heat setting for a mid-dark tonal value, and a long line stroke, fill in the bar pattern on the left sides of the feather. This mid-range temperature stroke will allow your previous shaping, shading, and detailing to show.
Using the ball tip or looped tip pen, a mid-dark tonal value setting, and the touch-and-lift dot pattern add the speckling pattern to the right side of the feathers.
Where needed, added fine mid-dark thin lines to accent your design along the leather string and feather shafts above the hair clusters. Do not completely outline these areas. If you have a tonal value burned area along the leather string you do not need the accent line. If the leather string has an area of unburned wood or extremely pale burn, then add a thin line to define the edge.
With the curved shader and a mid-dark tonal value setting, burn this hair lines into the hair clusters. Allow the hair lines to extend beyond its cluster, into the next cluster. Sign and date your work.
Wood Burning Step 11 – Add color
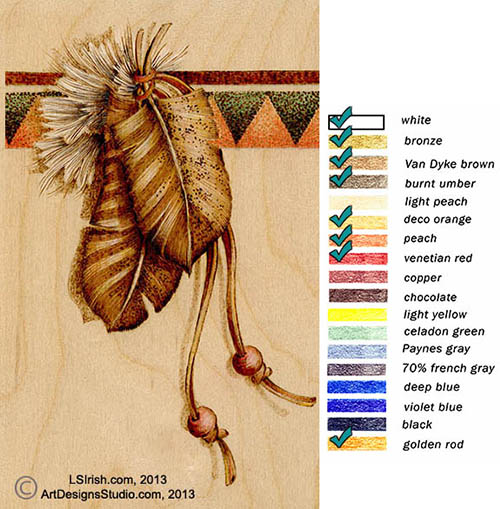
Let’s complete this Indian Feather and Geometric Line Border pattern by adding coloring with artist quality colored pencils. You can see the colored pencil chart in the image above.
There are several types of colored pencils, which you chose determines how clear, and clean your coloring is over your wood burning.
Student quality colored pencils are available at most craft stores, office supply stores, and even at your local drug store. These are low quality pencils and use either a clay or chalk base to the pigments. The clay body of this type of pencil leaves a cloudy, opaque look to the coloring and can block out your pyrography work.
Artist quality wax-based pencils are available through your local large craft store or online through an art supply house. I use both PrismaColor and Derwent. PrismaColor pencils have more wax to the pencil core and applies in a smooth, even finish. Derwent tend to have a harder core and are excellent for extremely fine line work. This style of colored pencil can be used in thin layers, one color over another, to blend the coloring and create new color hues.
PrismaColor also manufactures a watercolor pencil. They are applied in the exact same manner as wax-based pencils. After you have colored the area you can brush a light coat of clean water to the area, turning them into liquid watercolor for easy blending and shading.
Use a very sharp point to your pencil. Add your color in thin, light coatings. Three to five light coats of colored pencils gives a more even, smooth coloring. Use one color over another to create new hues. When you coloring is complete finish your Indian Feather and Geometric Line Border with several light coats of polyurethane or acrylic spray sealer.
Thank you for joining me in this free, online pyrography project – Lora Irish.
Pingback: Indian Feathers and Geometric LIne Border Pyrography Project by Lora Irish | LSIrish.com