
For the final steps in this Ceremonial Mask Pyrography Project we will be adding the fine line detailing to the feathers, leather, and fur in this Native American folk art styled pattern. The bars and speckling will be worked in the hawk feathers and we complete this five part free wood burning project.
Ceremonial Mask Pyrography Project 1
Ceremonial Mask Pyrography Project 2
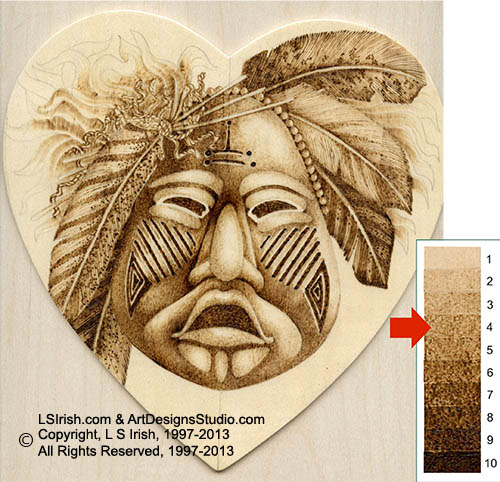
Ceremonial Mask Pyrography Project 3
Ceremonial Mask Pyrography Project 4
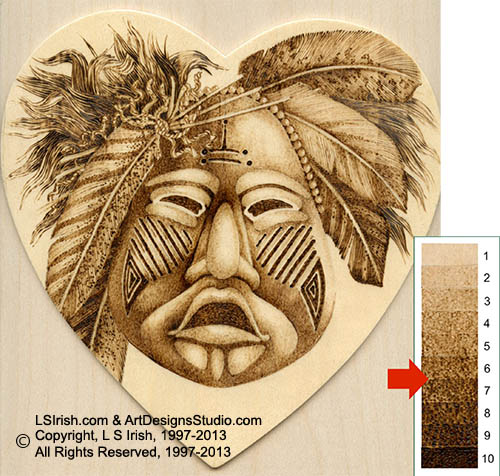
Ceremonial Mask Pyrography Project 5
12. Shade the Feather Shafts and Sticks
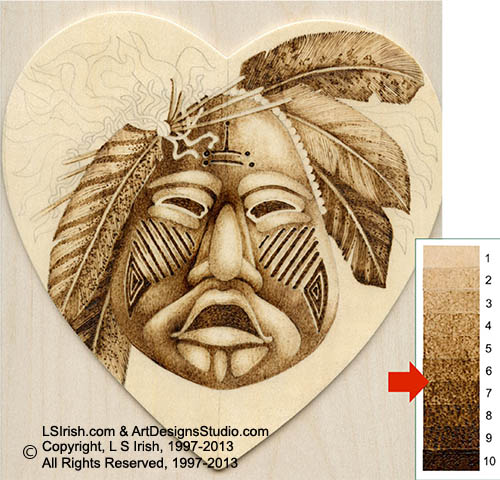
Using the ball or looped tip pen burn the spots, speckles, and stripes into your feathers.
Stripes are created using a slow motion and the long line pattern, working directly over the thin curved shader lines made in the last step. The slow movement of the pen intensifies the tonal value of the burn.
Speckles and dots are created in a simple touch-and-lift motion which leaves a medium sized dark value dot on the wood.
Vary the decoration patterns of the feathers.
Note that the final tonal value of the far left-side edge of the face and the background feather that touches it are almost identical.
13. Add the Twine Accents

Lower your temperature setting back to the #3 medium-pale to #4 dark-pale range. With the ball or looped tip pen shade the long, straight hair sticks, working from the twine knot towards the outer tip of the stick. The bead line is worked at this point.
The twine is worked by burning small s-shaped line strokes along the string, to suggest the individually twisted strings.
A texture can develop on your pyrography when you are working large, dark tonal value areas as the high temperature can raise the grain of the wood.
To remove those small grain lines, crumple an 8” square of brown paper bag into a loose ball. Briskly rub the crumpled paper over your burning. The brown paper acts exactly like extremely fine sandpaper without scratching or damaging your burning.
14. Spear Shade the Hair Clusters
The hair is worked in clumps for the basic shading, then individual hair strands are added. These next two steps are identical to the steps that created the feathers.
Using the spear shader for long, pull strokes, and a tonal value setting of #3 medium-pale to #5 light-medium, shade the hair clumps. Work your pen tip from the area nearest the face towards the outer edge of the wood.
The last half to one-third of each clump is left unburned.
15. Detail the Hair Lines
For this last step – burning the individual hair lines – you can use the spear shader on its edge, the ball or looped tip pen, or the curved shader.
I chose my ball tip pen on a hot tonal value setting of #6 mid-medium to # 9 mid-dark, using slow movement to create the dark hair lines.
Note in the photo that each hair line begins close to the face and is pulled towards the outer edge of the board. Allow extra air space as you move outward with your lines.
With the burning complete, clean up any remaining pencil tracing lines with a white artist eraser. White erasers contain no dye coloring which can stain your burning.
16. Finishing Steps
A. At this stage you can add coloring if you wish. Watercolor paints and watercolor colored pencils provide transparent pigments that tint your burnings without diminishing the tonal value work.
Ceremonial Masks are carved from wood and accented with natural fibers and feathers, their main color hues falls in the rust, brown, and black colors. These are the exact color tones that we have already achieved with the pyrography work. For this reason I have chosen not to add any additional coloring.
B. Clean your work well using a white artist eraser. This removes any pencil graphite left from the tracing steps and any dirt or oil from your hands. Wipe the work well with a dry, clean cloth to remove the eraser dust.
C. Lightly sand your work with a crumbled ball of brown paper bag. This will remove any loosened wood fiber.
D. Sign your work, either with your ball tip or looped tip pen on the front of the work or with a permanent marking pen on the back. Include the date, your town, and your country.
E. Use a spray sealer, following the directions of the can, to give a UV protection, waterproof finish. Several light coats, with amble time between coats to dry, works best.
Thank you for joining me in this Ceremonial Mask project. If you have questions or would like to submit a .jpg image of your finished mask burning, please contact me at LSIrish.com.
Pingback: Ceremonial Mask Pyrography Project | LSIrish.com